

Methi paratha is an easy to make Indian flatbread that is perfect to enjoy with any savory entrees from the sub continent.

More about methi and methi paratha

Methi is fresh fenugreek leaves that is used in a variety of dishes in India. It has an earthy, slightly bitter flavor that is considered to have a variety of health benefits including improving blood sugar, help with breast milk production, reduce inflammation etc.
The leaves are medium green and are usually a group of 3 tear drop leaves in each cluster. We usually don't use the stalks and remove the leaves from the stalk before using them. I would recommend washing the leaves very well before using since there can be dirt trapped in them. Another tip I would recommend is soaking the leaves in salted water for 15 minutes before adding to a dish*. This will ensure the bitterness is drawn out. I do want to add that once methi is cooked, I can barely taste any bitter notes.
Methi paratha is basically fresh methi leaves mixed in to the paratha dough and cooked over the tawa or griddle. Paratha is an Indian flatbread which is flaky and layered due to the way it is folded and rolled. Along with fenugreek, we will also add spices to the paratha dough.

Why try making methi parathas from scratch?
- Nothing beats fresh home made bread and that goes for these parathas as well. You get to choose how much oil/ghee goes in to it, the spice level etc.
- I personally love parathas because of the texture and feel like it is very underrated here in the west with all the limelight on naan.
- These are so easy to make! Dont worry about rolling it to make a perfect round shape etc(I am terrible at it btw!). It does not matter if they are rustic looking because they taste amazing.
- You can pretty much serve it a variety of sides and gravies like this methi paneer, green peas masala, channa saag, chettinad mushroom pepper fry, matar ka nimona.
- Get creative and make kathi rolls (Indian style burritos) by adding a variety of ingredients as stuffing like this aloo chana chaat, aloo methi along with some greens, tamarind and mint chutney.
List of ingredients

Atta(whole wheat flour) - Āttā is made from an Indian variety of wheat which tends to be drier and hence requires more water while kneading. However, you can absolutely use any other variety of whole wheat flour that you have at your disposal.
Methi - We will need around 1 bunch(it is usually sold as bunches). Methi is easily found in Indian stores. *Prepare as mentioned in the section above. Once clean, chop it finely to ensure you are able to mix it well.
Spices - We will need ajwain(carom seeds), turmeric powder, red chili powder and cumin powder. You can also add Garam Masala in place of cumin powder or in addition to it.
Oil - I used avocado oil to add to the dough and also to brush on top of the parathas. If you are not dairy-free, you can also use ghee. The fat helps keep the dough and in turn the parathas soft.
Warm water - I usually heat some water and use it while making the dough because I feel it tends to make the dough softer. I don't use a particular ratio of flour to water. Instead, I add some water at a time and gently bring the dough together. This helps to ensure there is no additional water which will leave the dough very wet.
Storage, Reheating and Meal Prep Tips

You can store the dough covered in cling wrap for up to 3 days in the refrigerator. The parathas should be good chilled for 3-5 days stored in a suitable container.
To use the dough after chilling, let it sit in room temperature for 30 minutes or so. Knead it gently and add a few drops of oil. Now the dough is ready to be used. For reheating the parathas, place on a hot tawa/griddle and toast on both sides until completely warm. You can also heat them in the microwave wrapped in a damp towel.
Meal prep - You can prepare the parathas and freeze them for up to 3 months. Once the parathas are cooked, let it completely cool down. Place in a freezer safe container. You can also choose to place parchment or wax paper between each paratha to easily separate them later.
To reheat, take them out of the freezer and reheat on a hot tawa on both sides until completely hot.
Let me know if you tried this delicious methi paratha! Leave a comment or feedback below. You can also follow along on Facebook, Bluesky or Pinterest.
Recipe

Methi Paratha
Equipment
- 1 Mixing Bowl
- 1 Tawa or Griddle
Ingredients
- 1 bunch Methi Leaves rinsed clean and finely chopped
- 2 ¼ cup Atta/Whole Wheat Flour keep aside ¼ cup for sprinkling on the dough while rolling out the parathas
- ~ 1 cup Warm Water
- 2 teaspoon Carom Seeds
- ¼ teaspoon Turmeric Powder
- 1 teaspoon Red Chili Powder
- 1 teaspoon Cumin Powder
- 3 tablespoon Avocado Oil or Any Neutral Oil divide in to 3 parts
- Salt to taste
Instructions
- Place the atta(flour) in a mixing bowl or plate. Add the carom seeds, turmeric powder, chili powder, cumin powder, salt and gently mix in the flour with your fingers. Add the chopped methi leaves along with 1 tablespoon of oil and mix well again.
- Add around ¼ cup of the warm water and start bringing the dough together with your fingers. Keep adding 2-3 tablespoons of water at a time until you see the dry flour coming together as dough. At this point, add just a tablespoon of water or so until the dough is finally ready. Keep aside covered for 10-15 minutes.
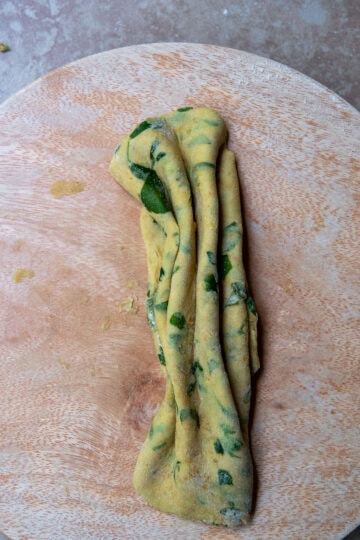
- Heat the tawa/griddle. While the tawa is heating, divide the dough in to 8 balls. Roll out each ball using a rolling pin in to a fairly circular shape.Sprinkle with a little flour if you find the dough sticky. Pleat the rolled out dough in an accordion style.

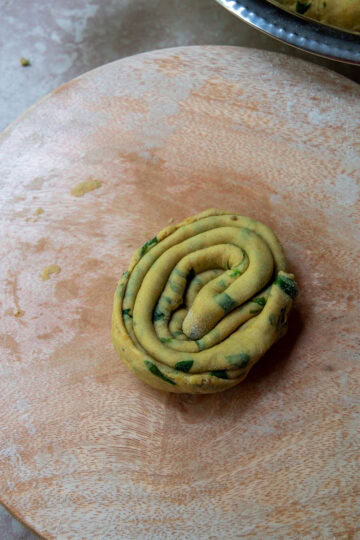
- Now roll one end of the pleated length inwards till it forms a circle. Flatten this circle slightly and roll it out in to the final parathas. You can either roll out all the parathas at once and then start cooking or roll them out one at a time while another is cooking on the griddle.
- Once the tawa is hot, add the paratha. Keeping the temperature/ flame at 'medium', wait for the paratha to cook on one side before flipping and cooking on the other side. Brush some of the oil lightly on both sides of the parathas to keep it soft. Take off the tawa and serve immediately or keep it covered until ready to serve.


Comments
No Comments